Compare XML Values with existing table rows
I have a MS SQL Table containing user data, e.g. Username and ID. This list should be compared with another list which is available as XML Document. Fortunately MS SQL 2005 is able to process XML so I searched around and found a post from Divya Agrawal on MSSQLTips.com. In Divyas tip 2 XML files are compared, so I modified it to compare XML and SQL row.
For this example, my SQL Table ‘Users’ has just 2 rows: “Name” (varchar(100)) and “ID” (int). My XML File looks like this:
<root>
  <data>
    <name>Thorsten Test</name>
    <id>123</id>
  </data>
  <data>
    <name>Peter Pommes</name>
    <id>124</id>
  </data>
  <data>
    <name>Wiki Pedia</name>
    <id>125</id>
  </data>
</root>
So I need to check whether ‘root/data/id’ from XML file is already in table column ‘ID’. If not, the name and the ID should be returned. This could be done with this little query:
CREATE PROCEDURE [dbo].[FindNewUsers]
  @Userlist XML
  AS
  BEGIN
    SET NOCOUNT ON;
    Select N.value('name[1]', 'varchar(100)') as Username,
      N.value('id[1]', 'int') as ID
      from @Userlist.nodes('/root/data') as X(N)
      where N.value('id[1]', 'int') Not in (select ID from Users)
  END
That’s it!

Use CustomValidator to check textbox depending on Radiobutton
For input validation I often use the Validators provided by Microsoft out of the box: RequiredFieldValidator to check whether user entered some data into the textbox, RangeValidator to check the range of numeric values or dates, RegularExpressionValidator to check the size of user input (and much more of course), CompareValidator to check dates, and today I had to use CustomValidator to check one field depending on another field.
My asp.net application contains a textbox which has to be filled if the user selected ‘Yes’ on a radiobutton. The RequiredFieldValidator does not help because you could not add a condition there. So it has to be done with the CustomValidator. I’ve searched around and finally combined several sources into this solution so here is a complete overview how to set up.
Have a look at my RadioButton. Nothing special here.
<asp:RadioButtonList ID="MyBtn" runat="server" RepeatDirection="Horizontal">
 <asp:ListItem Value="Yes" />
 <asp:ListItem Value="No" />
</asp:RadioButtonList>
And the corresponding Textbox is here:
<asp:TextBox ID="MyTxtBox" runat="server" />
As I want to do the validation in the client we have to do some Javascript here.
<script type="text/javascript">
 function validateMyBtn(oSrc, args){
   var rbtnValue = null;
   var rbtnList = document.getElementsByName('<%= MyBtn.ClientID %>');
   var radio = rbtnList[0].getElementsByTagName("input");
   for (var j = 0; j < radio.length; j++) {
     if (radio[j].checked)
      rbtnValue = radio[j].value;
    }
     if (rbtnValue == 'Yes') {
      args.IsValid = !(args.Value == "")
    } else {
       args.IsValid = true;
    }
  }
</script>
This little JavaScript loops through all options to find out which one is checked. (Therefor of course it makes sense to ensure that at least one option is selected, e.g. by setting a default option or using a RequiredFieldValidator.) The value of the selected option is then compared. If it’s not “Yes” the validation always returns “true” because the textbox is only mandatory if option “Yes” is selected. If it’s “Yes” the value is checked whether it’s empty. I was surprised about ‘args.Value’: ‘args’ is given by the CustomValidator, it’s the “ControlToValidate”.
Here is the CustomValidator Definition:
<asp:CustomValidator ID="MyTxtBoxValidator" runat="server"
  ControlToValidate="MyTxtBox" ValidateEmptyText="true"
  ErrorMessage="Please enter some values into Textbox"
  ClientValidationFunction="validateMyBtn">
</asp:CustomValidator>
Take care about the property “ValidateEmptyText”: If you miss this one, the validation is always “true” for empty fields….Just to have it complete, here is the RequiredFieldValidator for the radiobutton:
<asp:RequiredFieldValidator ID="MyBtnValidator"
  ControlToValidate="MyBtn" runat="server"
  ErrorMessage="Please make your choice" SetFocusOnError="true" />
That’s it!

How to call a modal popup from backend
There are several ways to call a modal popup from asp.net. You could code it on your own using JavaScript, or you could use existing frameworks like jQuery or Ajax Control Toolkit. As I use both of them, I decided to check with the Ajax Control Toolkit as this is already implemented and no further module needs to be referenced.
You could call the modal popup from the UI or from Backend. The current posting is just a reminder for me how to use it in backend. Continue reading…

Easiest way of asp.net deployment
When it comes to deployment of asp.net projects there are several ways, as described for example on MSDN. Working with ASP.net for several years I’ve found the easiest way of deployment for myself is using zip / rar to pack an archive of updated files. This works very well in both company and personal webserver configuration:
- In company I’m not allowed to deploy directly to the live server (as this is an admin job)
- The admin needs to be able to easily deploy the changes to stage server and afterwards to live server.
- The admin needs to be able to identify the changed files easily.
- At home I upload the files to my IIS via FTP as that’s easier than connecting to the machine via RDP and starting an update installation.
- Previously at home with shared hosting I only had access to my webspace via FTP and not via Remote Desktop of course.
Bearing these requests in mind I created a simple batchfile which does this job for me.
The batchfile is available for WinRar and 7-zip but could be modified easily for every packer which supports command-line packing.What it does:
- It checks the current directory and all subdirectories for modified files.
- It takes care of an exclusion list so e.g. your source code (*.vb, *.aspx.vb etc.) will not be added to the packed file.
- It adds current date to the filename of the packed file, e.g. ‘MyFiles20091231.rar’
- If the packed file already exists it will be deleted first.
Configure before first use:
- Set Archivename: Line 25 contains a variable ‘Archivename’. Set this to a name you like, e.g. ‘MyApp%yy%%mm%%dd%.rar’. You might remove the placefolders for current year (%yy%), month (%mm%) and day (%dd%) if you want to have always the same filename, but personally I prefer to have some kind of history, especially as these packed files are normally very small.
- Set Path to your packer: Line 31 starts with the filepath of the packer, e.g. ‘”C:\Program Files\WinRar\Winrar.exe”‘. Of course you need to change it if your packer is at another location.
- You might take a look at ‘Backup-ExcludeFiles.txt’. That’s an exclusion list, so all files listed here are NOT added to the packed file. You could use single filenames (‘web.config’), wildcards (‘*.zip’) or names of subdirectories (‘TestResults’).
- Now place all these files into your local application path, e.g. ‘C:\inetpub\wwwroot\MyApp’.
That’s all for the inital configuration!!
Configuration for every day use:
You’ve made some changes and want to deploy them? Just edit the 4th line of Backup.cmd. It contains a variable ‘LastUpdate’, holding the date and time of the last deployment. You have to edit this on your own. Why is it not computed automatically? Because maybe you made a deployment to stage and then add a bugfix. The new packed file of course also needs the files already deployed to stage, because otherwise you will get a problem while deploying to live. So this date should be the latest modification date for all your environments (local test, stage, live).
Now just start the batch file. You see a new file is created. This file could be forwarded to your admin, uploaded to another documentation system, or extracted locally to upload then via FTP to your (shared) hosting!
Download backup containing Backup.cmd and Backup-ExcludeFiles.txt

How to use NUnit with Visual Studio Express 2008
One of the important things missing in Microsofts Visual Studio Express Editions is the option to create Unit Tests. Fortunately there are some free Unit Test Tools, like xUnit.net, ExpressUnit, and lots more. Undoubtedly the best-known Unit Test Tool is NUnit. It’s written in C# and works perfect with current .net Frameworks. Setting up the tests is easy and there are several examples on their webpage, but it’s a bit complicated to get it more convenient. After some hours I faced 2 main questions:
- How could I access my app.config for the TestProject dll?
- How could I debug my tests?
Fortunately both questions could be answered easily. Continue reading…

How to change the xml documentation file name in Visual Studio Projects
If you haven’t used Sandcastle yet, please have a look at it. It’s easy to create developer documentation with it, especially for dlls you want to share with others. And the comment feature is already included in Visual Studio 2005, so why not use it? Continue reading…

The specified domain either does not exist or could not be contacted
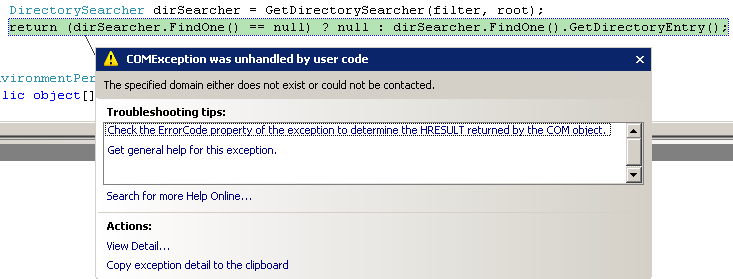
I took over an existing application from an external company. They were not available for us anymore, so we only had the source code on our server. I copied all the c-sharp files and created a new webpage project in my VS 2005. When I built the application it worked fine (after some customization), but when it came to access to Active Directory I always got the following error message:
“The specified domain either does not exist or could not be contacted.”

I wondered why it worked on the server and so I searched around. I found 2 tips which finally fixed the problem:
1. I created a default webapplication in IIS, and by default anonymous access to the webpage is enabled. When trying to access AD, the anonymous account is of course not found. So I disabled anonymous account.
2. In web.config I enabled impersonation with this line: <identity impersonate=”true”> within <system.web>
And now my application runs fine!

TFS 2005: TF30177: Team Project Creation failed
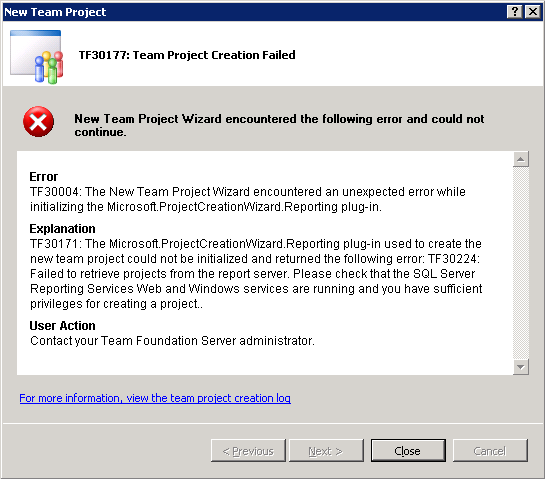
Today I wanted to add a new Project to my Team Foundation Server (TFS 2005). Unfortunately it did not work as expected. I entered all the data, and then it stops with error message TF30177: Team Project Creation failed. The details contained some more error codes like TF3004: The New Team Project Wizard encountered an unexpected error while initializing the Microsoft.ProjectCreationWizard.Reporting plug-in, TF30171: The Microsoft.ProjectCreationWizard.Reporting plug-in used to create the new team project could not be initialized and returned the following error: TF30224: Failed to retrieve projects from the report server. Checking the supplied logfile shows also TF30207: Initialization for plugin “Microsoft.ProjectCreationWizard.Reporting” failed and System.Net.WebException: Exception Message: The underlying connection was closed: The connection was closed unexpectedly. Continue reading…
