

Setup Azure Pipeline for Xamarin Forms App
If you want to implement continuous integration (CI) and continuous delivery (CD) for your Xamarin Forms app, Microsoft has quite good tutorials, also especially for Xamarin (Forms) Apps. But of course it’s never as easy as it should, so here are some problems I came across while setting up my CI/CD for my Xamarin Forms app. Maybe it’s also helpful for you. I do not use AppCenter for deployment but directly Apples AppStore and Google PlayStore, and you will find my working YAML at the end of this post.
Clone existing repository
In Microsofts tutorial, repository from https://github.com/MicrosoftDocs/pipelines-xamarin should be cloned. Yes, of course I did not do this on first step as I already have a working Xamarin Forms app which I want to use in my pipeline, but at least when you run into trouble it’s always good to have “approved” code from Microsoft so that you know problems are not caused by your configuration.
So go to your Azure DevOp account and create a new project “PipelineTest”. Once it’s done, open your new project, go to “Files” and scroll down to “Import a repository”. Click “Import” and use above mentioned https://github.com/MicrosoftDocs/pipelines-xamarin as Clone URL and confirm import.
Create your first Pipeline
Once import is completed, click “Pipelines” at the left navigation. Click “Create Pipeline” as it’s the only thing you could do there 😉 At “Where is your code?” select first option “Azure Repos Git” and select your new repository “PipelineTest”. DevOps automatically creates a default YAML which at the time of writing looks like this:
# Xamarin.Android and Xamarin.iOS
# Build a Xamarin.Android and Xamarin.iOS app.
# Add steps that test, sign, and distribute the app, save build artifacts, and more:
# https://docs.microsoft.com/en-us/azure/devops/pipelines/ecosystems/xamarin

jobs:

- job: Android
  pool:
    vmImage: 'windows-2019'

  variables:
    buildConfiguration: 'Release'
    outputDirectory: '$(build.binariesDirectory)/$(buildConfiguration)'

  steps:
  - task: NuGetToolInstaller@1

  - task: NuGetCommand@2
    inputs:
      restoreSolution: '**/*.sln'

  - task: XamarinAndroid@1
    inputs:
      projectFile: '**/*droid*.csproj'
      outputDirectory: '$(outputDirectory)'
      configuration: '$(buildConfiguration)'
      msbuildVersionOption: '16.0'

  - task: AndroidSigning@3
    inputs:
      apksign: false
      zipalign: false
      apkFiles: '$(outputDirectory)/*.apk'

  - task: PublishBuildArtifacts@1
    inputs:
      pathtoPublish: '$(outputDirectory)'

- job: iOS
  pool:
    vmImage: 'macOS-10.15'

  steps:
  # To manually select a Xamarin SDK version on the Hosted macOS agent, enable this script with the SDK version you want to target
  # https://go.microsoft.com/fwlink/?linkid=871629
  - script: sudo $AGENT_HOMEDIRECTORY/scripts/select-xamarin-sdk.sh 5_4_1
    displayName: 'Select Xamarin SDK version'
    enabled: false

  - task: NuGetToolInstaller@1

  - task: NuGetCommand@2
    inputs:
      restoreSolution: '**/*.sln'

  - task: XamariniOS@2
    inputs:
      solutionFile: '**/*.sln'
      configuration: 'Release'
      buildForSimulator: true
      packageApp: false
In the upper right, you’ll see a “Run” button. So why not click on it? Just do it, and your first pipeline run starts 🙂
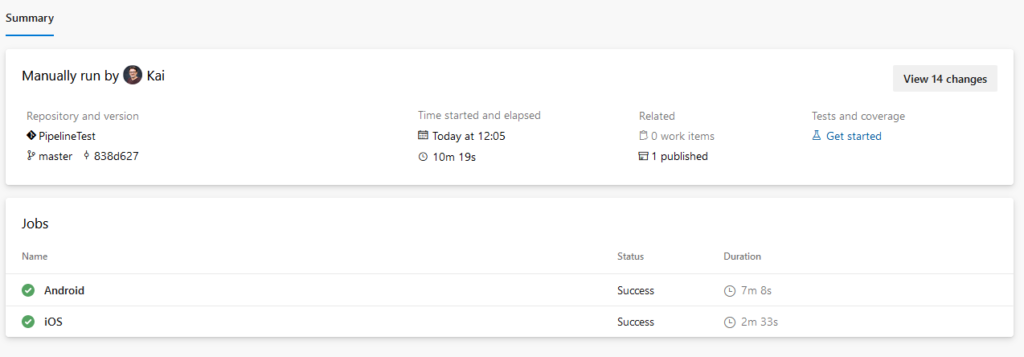
First pipeline run
In the pipelines overview, you’ll see the processing. It takes some minutes but should run successful with 2 green checkmarks next to Android and iOS.
So that’s the easy part because it’s just a build. No signing, no deployment, no key files etc.
Now go to your own project, open pipelines and create a new one. Probably your automatic YAML now has some differences compared with the first automatic YAML.
Get files for pipeline
For your own project you need some files, e.g. mobileprovision and signing. So here are some information what you need and how to get them. To upload them, go to Pipelines -> Library -> Secure Files.
iOS: Signing .p12
.p12 file is necessary to build and publish iOS apps. If you currently build and deploy manually, you’ll already have the necessary certificate on your Mac. How to create the .p12 file on your mac:
- Launch Keychain Access on your Mac
- In My Certificates, select the distribution certificate you want to use.
- Right-click the certificate and select Export
- Select a filename and make sure that filetype Personal Information Exchange (.p12) is selected.
- Select a secure password, e.g. with passwordsgenerator.net. Take care: To avoid problems later on, I’d advise to only use numbers and characters, but no symbols like comma, dot, hyphen etc. Numbers, upper- and lower-case letters should be fine and would not cause problems with encoding or else.
- Save the file and upload to Secure Files.
mobileprovision
Open your apple account website at Certificates -> Profiles and download the distribution profile you want to use.
keystore for Google Play Store
As explained in Microsofts documentation, you should find the keystore file for your App typically in ~/Library/Developer/Xamarin/Keystore/alias/alias.keystore. Another way to find the file is within Visual Studio when you sign your Android app. Just select your signing key and with right-click select “Show Alias Info”. In the new popup window scroll down to the bottom and find the location there. Upload it to your secure files library.
Add global variables for your pipeline
As we have uploaded some files for signing, we also need to tell Azure DevOps our passwords, but of course we don’t want to save them in clear text in the YAML. So go to Pipelines -> Library -> Variable group and create a new group like “build_variables” or else. Then add some variables you want / need to use in your pipeline.
For app-signing, we need at least variables like “Apple P12 Certificate Password” (that’s the password for the P12 file we created above) and for Android “key-password” and “keystore-password” from your Google Play Store keystore file. Don’t forget to tick the lock at the end of the line so that values are not shown anywhere.
Of course you could add as many variables as you like. For example you could add variables like “appstoretrack” (containing “TestFlight”), “googleplaytrack” (“alpha”), “buildConfiguration” (“Release”), “key-alias” (my keystore alias) and “minsdkversion” (“21”). These values are not hidden and you could change them easily then without touching the YAML. For me, I’ve decided to use the values right in the YAML without these variables so any changes would be logged in the source code versioning but it’s of course up to you.
Take care to add this variable group (e.g. “build_variables”) to the top of your pipeline as shown in Microsofts documentation:
variables:
- group: build_variables
Deploy Xamarin Forms App to Apple Testflight
By default, Azure Pipelines offer to deploy your Xamarin Forms App via Microsofts AppCenter but I want to use Testflight for iOS Devices. Fortunately, Microsoft has an Apple App Store Extension available on their Visual Studio Marketplace. Install it in your organization and you’ll find a new option “Apple App Store Release” in your list of available pipeline tasks. Configuration setup is described on the above mentioned extension-page on VS Marketplace and also on the corresponding Github page. After you’ve added your new service connection, add a new “Apple Store Release Task” to your pipeline as described in Github Readme.
Deploy Xamarin Forms App to Google Play Store
Of course you could also deploy your Xamarin Forms App to Google Play Store instead of AppCenter. Again, Microsoft has a Play Store Extension on their Visual Studio Marketplace and documentation can be found there on the corresponding Github page. After adding your service connection, add a new “Google Play -Release Bundle” to your pipeline as described in Github readme.
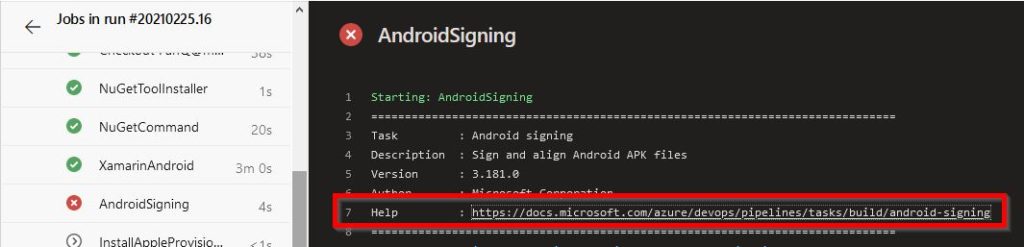
Errors
Most of the single tasks in your pipeline, e.g. “AndroidSigning” have a link at the top with very detailled information about this single task. So it’s always a good idea to scroll to the top of the file and check the linked documentation.
##[error]Error: The process ‘/Users/runner/Library/Android/sdk/build-tools/30.0.3/apksigner’ failed with exit code 1
Quite generic, but in the detailed log I found this:
Exception in thread “main” com.android.apksig.apk.MinSdkVersionException: Failed to determine APK’s minimum supported platform version. Use –min-sdk-version to override at com.android.apksig.apk.MinSdkVersionException: Failed to determine APK’s minimum supported Android platform version
Of course I do have a minimum SDK version set in my Xamarin Forms app, but AndroidSigning Task wants to have a dedicated line so just add e.g. “apksignerArguments: –min-sdk-version 21” as described in Androids ApkSigner Documentation.
##[error]Error: The Xcode workspace was specified, but it does not exist or is not a directory
I don’t know why but in my case, automatic YAML contained an XCode@5 Task which throws errors like
##[error]Error: The Xcode workspace was specified, but it does not exist or is not a directory: /Users/runner/work/1/s/**/*.xcodeproj/project.xcworkspace
Simple Solution: Remove the XCode@5 Task from pipeline. No XCode Task is needed for Xamarin Forms app.
##[error]Error: Input required: releaseNotesInput
Task AppCenterDistribute@3 has parameter ‘releaseNotesOption which is set to ‘input’ by default as seen in documentation. If so, you also have to specify parameter ‘releaseNotesInput‘. To get it running, it’s fine to just use ‘Test release’ as parameter value. In order to avoid a change in your azure pipeline yaml on each release you might want to set it to ‘file‘ later on once it’s working.
##[error]Error: The process ‘/usr/local/lib/ruby/gems/2.7.0/bin/fastlane’ failed with exit code 1
Check the detailled log output for the App Store Release Task. In my case, details show this message:
ERROR ITMS-90189: “Redundant Binary Upload. You’ve already uploaded a build with build number ‘4.8.6’ for version number ‘4.8.6’. Make sure you increment the build string before you upload your app to App Store Connect. Learn more in Xcode Help (http://help.apple.com/xcode/mac/current/#/devba7f53ad4).” The call to the iTMSTransporter completed with a non-zero exit status: 1. This indicates a failure.
So that’s clear: I’ve added the App Store Release Task and ran the pipeline, but of course the compiled app could not be uploaded as i have already uploaded the file manually before. So that’s fine and should be check on next real update where also the version number is increased.
Equivalent on Google Play Store upload is this error message:
##[error]Error: Failed to upload the bundle /Users/runner/work/1/s/MyApp.Android/obj/Release/android/bin/myapp.aab. Failed with message: Error: APK specifies a version code that has already been used..
##[warning]Can\’t find loc string for key: ShouldSkipWaitingForProcessingNotTrue
Followed by “##[warning]ShouldSkipWaitingForProcessingNotTrue“. This could happen in Task AppStoreRelease after uploading your app to iOS AppStore. Upload ran fine, and you could find your new build in Testflight (depending on the selected releaseTrack of course) but in the log of Task AppStoreRelease you will see this:
Login to App Store Connect (***)
Two-factor Authentication (6 digits code) is enabled for account ‘***’
More information about Two-factor Authentication: https://support.apple.com/en-us/HT204915
If you’re running this in a non-interactive session (e.g. server or CI) check out https://github.com/fastlane/fastlane/tree/master/spaceship#2-step-verification
/usr/local/lib/ruby/gems/2.7.0/gems/highline-1.7.10/lib/highline.rb:624: warning: Using the last argument as keyword parameters is deprecated
Please enter the 6 digit code you received at +49 •••• •••••45:
Of course you could not enter the code from the received SMS in azure pipeline console. In fastlanes doc about application specific passwords you will find a note saying “The application specific password will not work if your action usage does anything else than uploading the binary, e.g. updating any metadata like setting release notes or distributing to testers, etc.” So uploading works fine but you could not automatically e.g. distribute it to the testers.
Easiest method to fix: do not try to automatically publish. Check Fastlane docs for information how to overcome this problem, but for me it’s fine to manually release the uploaded file in Apples AppStore (means confirming whether my app uses encryption or not). I like to have a manual look there, and it just takes 2 minutes so I’ll skip that for now. For that, just add “shouldSkipWaitingForProcessing: true” to your AppStoreRelease@1 Task.
##[error]TF24668: The following team project collection is stopped. Start the collection and then try again. Administrator Reason: abuse
Out of the sudden I got this error message right at the start of the pipeline, no action was done. Searching around shows that this is caused by Microsoft itself as explained by Vito Liu on StackOverflow. And lots of comments there right at the time of writing, so I “fixed” it by going to bed and on the next morning everything worked fine again 🙂 Hope you have the same good night if you ever run into this problem 😉 Here is the info from Microsoft about this case.
##[error]Xamarin.iOS task failed with error Error: The process ‘/Library/Frameworks/Mono.framework/Versions/Current/Commands/msbuild’ failed with exit code 1.
As this is a quite generic error, check the details of the failed job.
- ##[warning]Multiple solution file matches were found. The first match will be used: /Users/runner/work/1/s/._myapp.sln: In this case, for some reasons I had a new _myapp.sln in my repository. Easiest fix would be deletion of this file. Or you could also edit your pipeline and in job XamariniOS@2 define the solution exactly. In my case it’s just ‘**/*.sln’ so it’s understandable that the job is confused when 2 files fall into this condition.
- /Users/runner/work/1/s/MyApp.Android/obj/Release/lp/129/jl/res/color/common_google_signin_btn_text_light.xml(2): error APT2000: no element found. [/Users/runner/work/1/s/MyApp.Android/MyApp.Android.csproj]: Yes, My Xamarin.iOS task has message from Android! Next to it, there are also error APT2261: file failed to compile and error APT2000: no element found. and finally Done Building Project “/Users/runner/work/1/s/MyApp.Android/MyApp.Android.csproj” (default targets) — FAILED. No idea why these errors appear, but fortunately they disappeared after running the same pipeline job again so sometimes it only takes restarting to fix the problem.
YAML Example
So here is my YAML as an example which is in use. Replace the values in [square brackets] with your own app data.
# Xamarin Forms
# Build a Xamarin Forms project.
# Add steps that test, sign, and distribute an app, save build artifacts, and more:
# https://docs.microsoft.com/azure/devops/pipelines/languages/xamarin

trigger:
- master

pool:
  vmImage: 'macos-latest'

variables:
- group: build_variables

steps:
- task: NuGetToolInstaller@1

- task: NuGetCommand@2
  inputs:
    restoreSolution: '**/*.sln'

# Xamarin.iOS

- task: InstallAppleCertificate@2
  inputs:
    certSecureFile: '[MyAppleP12CertFilename.p12]'
    certPwd: '$(Apple P12 Certificate Password)'

- task: InstallAppleProvisioningProfile@1
  inputs:
    provisioningProfileLocation: 'secureFiles'
    provProfileSecureFile: '[MyAppleDistributionFilename.mobileprovision]'

- task: XamariniOS@2
  inputs:
    solutionFile: '**/*.sln'
    configuration: 'Release'
    clean: true
    packageApp: true
    runNugetRestore: false
    signingIdentity: '$(APPLE_CERTIFICATE_SIGNING_IDENTITY)'
    signingProvisioningProfileID: '$(APPLE_PROV_PROFILE_UUID)'

# Xamarin Android

- task: XamarinAndroid@1
  inputs:
    projectFile: '**/*droid*.csproj'
    outputDirectory: '$(build.binariesDirectory)/$(buildConfiguration)'
    configuration: 'Release'

- task: AndroidSigning@3
  inputs:
    apkFiles: '**/*.aab'
    apksignerKeystoreFile: '[MyGoogleKeyStoreFilename.keystore]'
    apksignerKeystorePassword: '$(keystore-password)'
    apksignerKeystoreAlias: '$(key-alias)'
    apksignerKeyPassword: '$(key-password)'
    apksignerArguments: --min-sdk-version 21

- task: GooglePlayReleaseBundle@3
  inputs:
    serviceConnection: 'Google PlayStore'
    applicationId: '[MyGoogleBundleId, e.g. com.domain.app]'
    bundleFile: '**/*.aab'
    track: 'alpha'
    rolloutToUserFraction: true
    userFraction: '100'

- task: AppStoreRelease@1
  inputs:
    serviceEndpoint: 'Apple AppStore'
    appIdentifier: '[MyAppleBundleId, e.g. com.domain.app]'
    appType: 'iOS'
    releaseTrack: 'TestFlight'
    appSpecificId: '1334169546'
    shouldSkipWaitingForProcessing: true
    installFastlane: true

