Using HockeyApp with Xamarin Forms
HockeyApp is quite popular, mainly for collection crash reports, but also helpful for distribution, user feedback etc. To add it into your Xamarin Forms Application, I found video Integrating HockeyApp to Xamarin Forms by Houssem Dellai very helpful. Also How to integrate HockeyApp with Xamarin on HockeyApp Support is helpful but it’s not especially about Xamarin Forms. It’s for Xamarin iOS and Android so it’s also important for Xamarin Forms, but e.g. the feedback option might need some further information. So here is a short summary how to implement into Xamarin Forms and also add the Feedback option.
Configure HockeyApp for XamarinForms with iOS and Android
- Create new apps in HockeyApp for both iOS and Android.
- Add nuget package HockeySDK.Xamarin to all your projects including PCL.
- For iOS, open AppDelegate.cs and add the following lines before LoadApplication-Call. Replace HockeyApp_AppID with your iOS AppID from HockeyApp.
var manager = BITHockeyManager.SharedHockeyManager;
manager.Configure(HockeyApp_AppId);
manager.StartManager();
manager.Authenticator.AuthenticateInstallation();
- For Android, open MainActivity.cs and add the following lines before LoadApplication-Call. Again replace HockeyApp_AddID with your Android App ID from HockeyApp.
CrashManager.Register(this, HockeyApp_AppId);
MetricsManager.Register(Application, HockeyApp_AppId);
- Nothing needs to be done within the PCL (except adding the nuget package of course).
Track Events with HockeyApp for Xamarin Forms
Crashes are tracked automatically by HockeyApp, nothing else than the configuration above needs to be done. But maybe you want to track some events manually, e.g. User Login. In this case, just add the following line in your PCL code:
HockeyApp.MetricsManager.TrackEvent("UserLogin successfull.");
Use HockeyApp Feedback option in Xamarin Forms
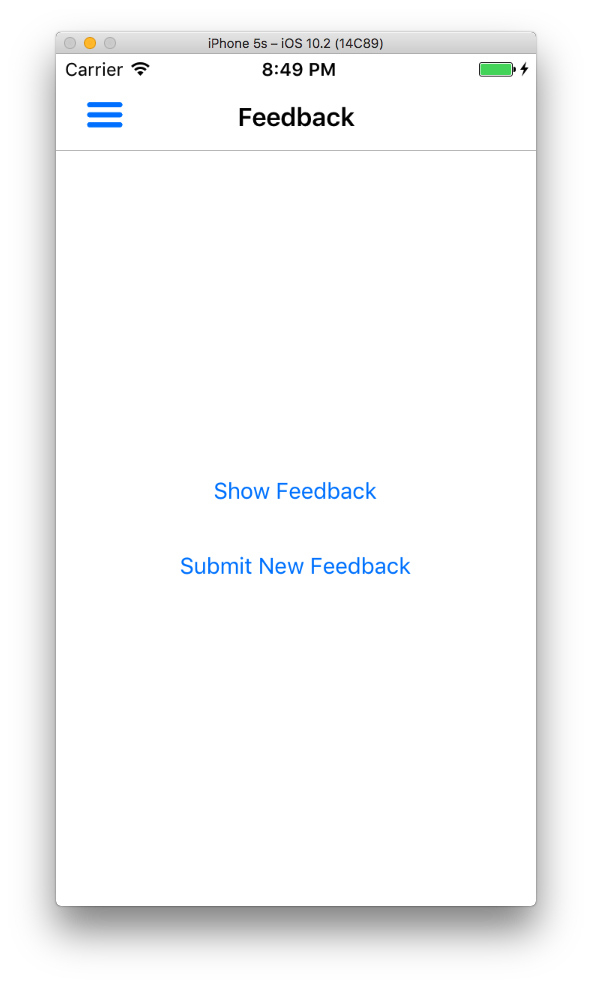
HockeyApp also offers a feedback option. Unfortunately this is not available in PCL so you have to create the action within iOS and Android and then supplied it to your PCL. HockeyApp Sample for XamarinForms contains example how to create the Feedback Buttons and supply them to the PCL, but in current example I’ve integrated them as a menu list item in the Master Detail Page sample from Xamarin so it’s shown within the menu. If you follow these steps, don’t worry if you get error messages in between. For example if you update the LoadApplication in step 2, you will get an error because you did not update the App.xaml.cs yet. But in this order it’s probably easier to understand what needs to be done. And in the end, all errors are gone 🙂
- For iOS, add this code to your AppDelegate.cs right before your LoadApplication-call:
var showFeedbackButton = new Xamarin.Forms.Button {Text = "Show Feedback"}; showFeedbackButton.Clicked += (sender, e) => { manager.FeedbackManager.ShowFeedbackListView ();};var submitNewFeedbackButton = new Xamarin.Forms.Button {Text = "Submit New Feedback"}; submitNewFeedbackButton.Clicked += (sender, e) => {manager.FeedbackManager.ShowFeedbackComposeView ();}; - Now these 2 buttons have to be supplied to your PCL. So update the LoadApplication-call to supply your 2 new buttons to the PCL:
LoadApplication(new App( showFeedbackButton, submitNewFeedbackButton ));
- Similar steps now also for Android. Open MainActivity.cs and add the following lines before your LoadApplication-call:
var showFeedbackButton = new Xamarin.Forms.Button{Text = "Show Feedback"}; showFeedbackButton.Clicked += (sender, e) => { //Register with the feedback manager FeedbackManager.Register(this, HockeyApp_AppId, null); //Show the feedback screen FeedbackManager.ShowFeedbackActivity(this); }; - As you see, only one button has been added so in your MainActivity.cs you need to update LoadApplication like this:
LoadApplication (new App (showFeedbackButton));
- Open your App.xaml.cs and update the App-Procedure so it accepts some parameters:
public App(params View [] children)
- Forward all the received childrens also to your MainPage Form:
MainPage = new MainPage(children);
- As we don’t need it immediately in the Main Page we define a new item in the class for later usage:
View[] feedbackChildren;
- Now create a feedback page in your PCL. Here is a rather simple page:
public FeedbackPage(params View[] children) { InitializeComponent(); StackLayout ContentLayout; ContentLayout = new StackLayout(); foreach (var child in children) ContentLayout.Children.Add(child); Content = new ScrollView { Content = ContentLayout, HorizontalOptions = LayoutOptions.Center, VerticalOptions = LayoutOptions.Center }; } - The menu items trigger the OnItemSelected action within MainPage.xaml.cs so we need to modify this for the Feedback page:
void OnItemSelected(object sender, SelectedItemChangedEventArgs e) { var item = e.SelectedItem as MenuPageItem; if (item != null) { if (item.TargetType.ToString() == "MyApp.FeedbackPage") Detail = new NavigationPage(new FeedbackPage(feedbackChildren)); else Detail = new NavigationPage((Page)Activator.CreateInstance(item.TargetType)); menuPage.menuListView.SelectedItem = null; IsPresented = false; } } - In the Menu Page (where you create all your menu list items), add a new menu list item:
menuPageItems.Add(new MenuPageItem
{
    Title = "Feedback",
    IconSource = "feedback.png",
    TargetType = typeof(FeedbackPage)
});
So now your users could send you feedback directly within your app and you could reply easily.