Xamarin Error after migrating macbook: No valid iOS code signing keys found in keychain
I was busy the last months with creating a Windows Universal App, and now it’s time to start with the iOS version using Xamarin. To get a bit more familiar with Xamarins iOS environment I’ve downloaded Xamarins sample app called Sport.
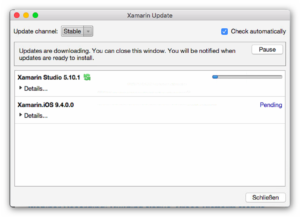
At first I got several error messages regarding missing types or namespaces. Fortunately you only need to wait a bit and Xamarin Studio automatically downloads all necessary libraries etc. But 1 error did not disappear:
/Library/Frameworks/Mono.framework/External/xbuild/Xamarin/iOS/Xamarin.iOS.Common.targets: Error: No valid iOS code signing keys found in keychain. You need to request a codesigning certificate from https://developer.apple.com. (Kalabo.iOS)
![]()
The proposed solutions were always the same, e.g. in Xamarin forum: Get the Dev certificate from Apple. So I started XCode and at Preferences -> Accounts I clicked the plus symbol in the lower left to add a new apple id. Everything worked fine, I downloaded the iOS development and iOS distribution signing identity. Then I went back to Xamarin, but still the same error.
Another proposal was to delete the entitlements.plist so I did this also even though it’s just an option. So this also did not fix it.
Fortunately the excellent Xamarin Support was able to help: You do not only need the public keys from the user certificate which are stored in the apple store. You also need the private keys which are only stored on the local machine. See also https://developer.xamarin.com/guides/ios/getting_started/installation/device_provisioning/#Understanding-Certificate-Key-Pairs for details. One option would be the recreation of the private keys, and the other would be the export from the old machine.
So the problem does not appear when you install the keys in XCode for the first time, because the private keys are automatically created. But when you move to a new machine this is an important step.
Details for exporting and importing your Developer Profile are supplied by Apple at https://developer.apple.com/library/ios/documentation/IDEs/Conceptual/AppDistributionGuide/MaintainingCertificates/MaintainingCertificates.html#//apple_ref/doc/uid/TP40012582-CH31-SW16
And now compiling the sample app works fine.
Use SSL from StartSSL with i-MSCP (internet multi-server control panel)
Typically my domains are hosted by IP Projects. For administration of their php webhosting packages they use i-MSCP (internet Multi Server Control Panel).
Next typical thing: For my SSL-Certifications in most cases I use StartSSL. It’s a free, fast and reliable service, and it already exists for years, long before Googles and Mozillas Let’s encrypt campaign.
Unfortunately i-MSCP and certificates from StartSSL do not work quite well together by default…..
Invalid CA Bundle
That’s the error message when you just use the files provided by StartSSL via mail: Invalid CA Bundle.
In i-MSCP you have to provide 3 files to enable SSL:
- Private Key
- Certificate
- CA-Bundle
The private key is created by yourself. You could use the Tool provided by StartSSL for it.
The certificate is then mailed to you by StartSSL. Open the ApacheServer.zip and there you’ll find a file called ‘2_yourdomain.com.crt’.
Create the CA Bundle file
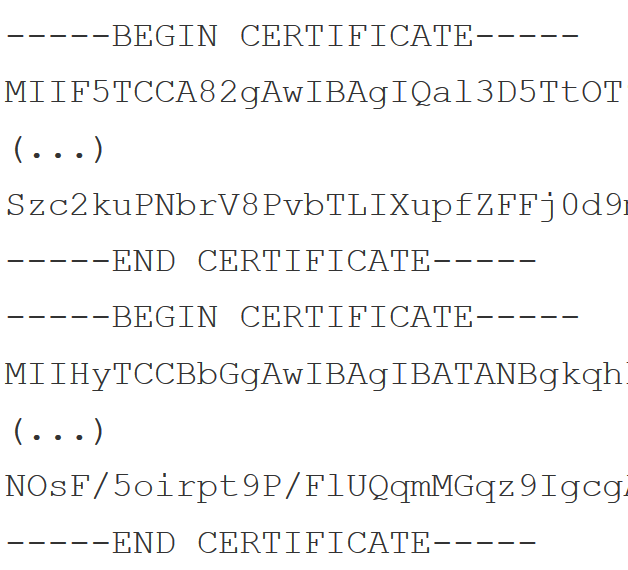
And here comes the tricky part: You have to create the CA-Bundle file on your own! Again open ApacheServer.zip and now open file ‘1_root_bundle.crt’ in a text editor. Then have a look at OtherServer.zip and open the included ‘root.crt’ with a text editor. Copy the whole text from ‘root.crt’ and paste it AFTER the text of ‘1_root_bundle.crt’! So the new file should look like this (if replaced some lines just with the 3 dots to have a better overview. Your file should of course not include the dots)
-----BEGIN CERTIFICATE-----MIIF5TCCA82gAwIBAgIQal3D5TtOT9B7aR6l/OxkazANBgkqhkiG9w0BAQsFADB9(...)Szc2kuPNbrV8PvbTLIXupfZFFj0d9mpaFg==-----END CERTIFICATE----------BEGIN CERTIFICATE-----MIIHyTCCBbGgAwIBAgIBATANBgkqhkiG9w0BAQUFADB9MQswCQYDVQQGEwJJTDEW(...)NOsF/5oirpt9P/FlUQqmMGqz9IgcgA38corog14=-----END CERTIFICATE-----So that’s your CA Bundle file. Copy it into your CA Bundle input textbox in your i-MSCP and everything should work fine now!
Update
At another provider I got the following warning (on german) when I upload my SSL certificates:
“Warnung: Das CA-Zertifikat signiert nicht das Zertifikat.”
which means “Warning: The CA-Certificate does not sign the certificate.”. To workaround this error, the solution is the same as described above. Just merge the 2 files and use this new file as the CA Certificate.

Xamarin Documentation Update does not work: DocSet Folder not found
I had the problem also after last update, and now it appears again so I blog the solution in case it happens next time again…
After upgrading my Xamarin I get the following message when I start Visual Studio again:
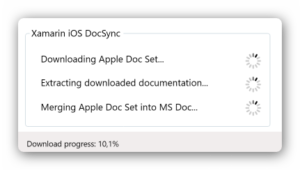
Xamarin iOS Documentation Update – Click here to open the Documentation Manager

So I clicked on it a new window appears in the lower right. Unfortunately it contains the following error:
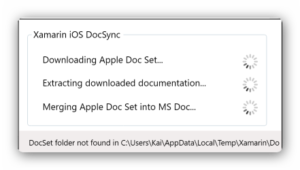
DocSet folder not found in C:\Users\Username\AppData\Local\Temp\Xamarin\ …
To fix the problem you just have to delete all the existing Documentation Files. They are located at %localappdata%\Temp\Xamarin , e.g. C:\Users\Username\AppData\Local\Temp\Xamarin.
100.000 Downloads
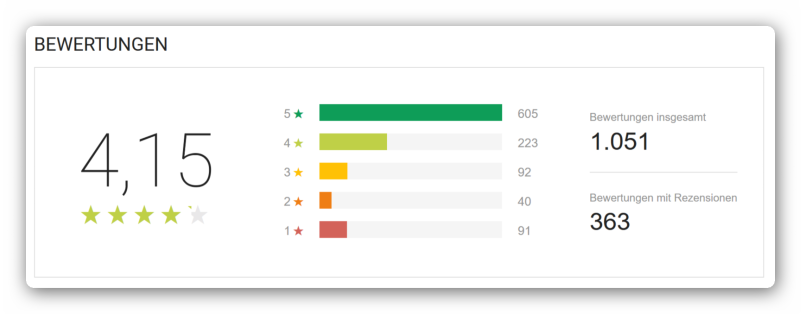
Einen Monat verspätet gibt es hier nun eine kurze Zusammenfassung für unsere App “Fussball im FreeTV” mit den Downloadzahlen und Bewertungen bis Ende 2015. Insgesamt wurden die Apps über 100.000-mal heruntergeladen und in allen 3 Stores erreicht die App mindestens 4 von 5 Sternen!
- Android: 60.000 Downloads, 4,15 von 5 Sternen bei 1051 Bewertungen
- Windows Phone: 40.000 Downloads, 4,5 von 5 Sternen bei 678 Bewertungen
- iPhone: 10.000 Downloads, 4 von 5 Sternen bei 26 Bewertungen
Wir bedanken uns bei allen Nutzern und konnten Euch hoffentlich bei Eurer Fussballplanung ein wenig helfen. Für Tipps und Anregungen sind wir weiterhin dankbar und freuen uns auf Euer Feedback!
Android – Google Play Store
Windows Phone – Microsoft Marketplace
iOS – Apple Store
How to re-install a hidden Windows 10 app from Microsoft Store
I’ve created a Windows 10 Universal App and uploaded a beta to the store. It’s approved by Microsoft so it’s available now. I’ve set visibility to hidden and created some promotional codes so only users with the code are able to download the app. I’ve used the first code and installed it on my Windows 10 client. Everything is fine.
Then I’ve uninstalled the app from my client and now I want to re-install it from Microsoft Store but I don’t find an option to do so!!!!
- First I opened the link which was provided by Microsoft in the “Your submission has passed certification” mail. It’s a link to the Microsoft Store. It opens and shows details about my app, but there is not Download or Install button even though I’m logged in with my account.
- I’ve clicked on the initial link which leads to https://account.microsoft.com/billing/redeem#/ . I am logged in with my account. I enter my code and it says: “This code has already been redeemed.”
- So I use another code from my list. It shows the name of my app and I click on ‘Redeem’. Then it says: “You already own this. Why not give your code to a friend?”
- I’ve also checked my Dashboard on http://dev.windows.com but there is no option to download or install. Additionally this would not work for my other betatesters of course.
So how could I re-install my hidden app from Microsoft Store?
The only thing that worked: Use the next code with a different Microsoft Account! This will show you the link to the installation:
ms-windows-store://PDP/?productid=[YourProductIDhere]&entitlementsync=true
The Product ID could e.g. be found in Microsofts mail as it contains a link to https://www.microsoft.com/store/apps/[YourProductIDHere] . ProductID is typically a 12 characters mix of letters and numbers.

Sign an APK for uploading to Google Play Store
For our app on http://FussballimFreeTV.de we have versions for iOS, Android and WindowsPhone. Now we wanted to deploy a new Android Version, but on my new notebook I did not have Eclipse installed anymore. So I needed to find out how to sign the provided APK with Android Studio.
But as documentation says: You do not need Android Studio to sign your app!
Install JDK
So just download the latest JDK from Oracle. For me this is currently JDK 1.8.0_65 for Windows x64. I’ve installed it to C:\Program Files\Java\jdk1.8.0_65 as proposed. The bin-folder contains all the files we need.
Signing the APK
I have my APK in a separate directory, containing a subdirectory ‘keys’ where I have my key stored from Google Play Store. So I opened a command prompt in the directory where my APK is located. According to the documentation mentioned above, this would be the line to be executed at the command prompt:
"C:\Program Files\Java\jdk1.8.0_65\bin\jarsigner.exe" -verbose -sigalg SHA1withRSA -digestalg SHA1 -keystore keys\my.key my.file.apk myalias
Of course you have to modify the last 3 parameters of this line:
- keys\my.key: That’s the key I use to sign. It’s located in a subdirectory ‘keys’.
- my.file.apk: That’s the apk you want to sign. It’s located in current path.
- myalias: That’s the alias set in your key.
Hmm, my alias? Fortunately there is an easy way to find out, as Umitk has described on stackoverflow:
keytool -keystore keys\my.key -list -v
The first value is ‘Aliasname’, and that’s the one you have to use when you want to sign your apk.
OK, so now we are ready to sign the apk. But then…
jarsigner: unable to sign jar: java.util.zip.ZipException: invalid entry compressed size (expected 948 but got 960 bytes)
The following error message was thorugh by jarsigner:
jarsigner: unable to sign jar: java.util.zip.ZipException: invalid entry compressed size (expected 948 but got 960 bytes)
Hmm.. Fortunately joerg has given the answer here:
- Open the apk in a zip program (like 7-zip)
- delete the folder ‘META-INF’
- save the apk and try to sign again
And as a result it should work fine now: jar signed 🙂
Use ZipAlign on APK
As the above mentioned documentation describes you should afterwards verify the signature and then zipalign the apk, otherwise you cannot upload it to Google Play Store.So where do you find zipalign? It’s part of the Android SDK, so it’s located somewhere like C:\Program Files (x86)\Android\android-sdk\build-tools\23.0.1. To zipalign your apk this would be the command to execute:
"C:\Program Files (x86)\Android\android-sdk\build-tools\23.0.1\zipalign.exe" -v 4 your.existing.apk your.new.apk
This will zipalign your.existing.apk and then save the result as your.new.apk.
Now you are ready to upload your new signed and zipaligned apk to Google Play Store via Google Play Developer Console.
Additionally here is a short CMD which uses 7-Zip to delete the META-INF-Directory, then signs the app and finally calls zipalign. Maybe you need to adjust the directories to your needs.
SET UNSIGNED=my.unsigned.apk
SET ALIAS=myalias
SET SIGNED=my.signed.apk


DEL %SIGNED%
rename "%UNSIGNED%" "%UNSIGNED%.zip"
"C:\Program Files\7-Zip\7z.exe" d "%UNSIGNED%.zip" META-INF
rename "%UNSIGNED%.zip" "%UNSIGNED%"

"C:\Program Files\Java\jdk1.8.0_65\bin\jarsigner.exe" -verbose -sigalg SHA1withRSA -digestalg SHA1 -keystore keys\my.key %UNSIGNED% %ALIAS%

"C:\Program Files (x86)\Android\android-sdk\build-tools\23.0.1\zipalign.exe" -v 4 %UNSIGNED% %SIGNED%
Error running iOS in Xamarin: Please select a valid device before running the application
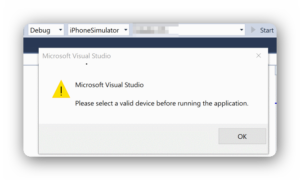
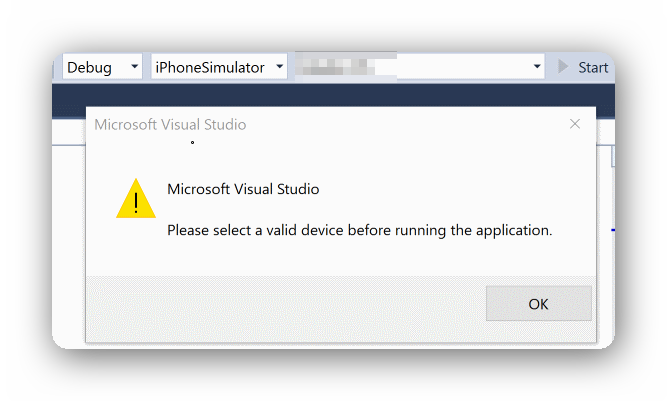
Yesterday I bought my Xamarin License for iOS and so I wanted to compile my first app today. I switched the startup project to iOS and clicked “Start”, but I only got the following error message from Microsoft Visual Studio:
Please select a valid device before running the application.
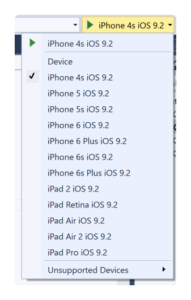
I checked the device selector dropdown list, and there I only had “Device”, not simulators.
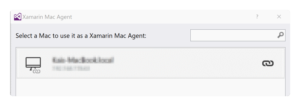
Hmm… Xamarin Agent is already connected to my mac.
So what else could it be? Ah… there has been an update lately, and I did not update Xamarin Studio on my Mac.
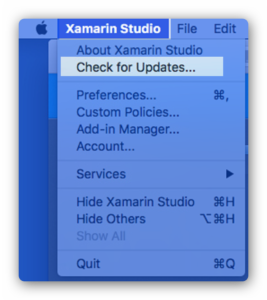
So simply start Xamarin Studio on the Mac. You don’t need a valid license there, Starter Edition is fine. The click “Xamarin Studio” and “Check for Updates”.
This will automatically download and also asks to install after downloading.
And after restart, all simulators are available in my Visual Studio 2015.

Logging extended Properties to Azure SQL with Enterprise Library 6
As written in my previous posts I’m currently playing around with migrating an application to MS Azure. This includes the migration from Enterprise Library 5 to Enterprise Library 6. And as it’s Azure, logging could not be done to the file system. I played around with semantic logging for a while, but unsuccessfully. So now I’ve just switched to Logging to Azure SQL. This does not require much changes in my code. Of course some configuration, but not comparable to the new semantic logging.
Extended Properties
Enterprise Library Logging block allows the usage of extended Properties. So next to category, priority, message etc. it’s possible to have additional attributes. For a web application this might contain e.g. the username, the session id, the IP address etc. Having a unique key like session id as extended property in every log message makes it awards easy to focus just on this single user session where an error appeared.
By default, Enterprise library supports having the extended properties just within a string ‘FormattedMessage’. This formatted message could be set up in your web.config. But then you need to process a ‘LIKE’-Query later on so I tried to add the values into dedicated columns, making it easier to search later on. And easy to disable it in the stored procedure later on for performance reasons or else.
So here is my solution how to split the extended properties of the logging application block into separate columns in Azure SQL.
Update Database Table
For this example I just use 2 extended properties: Session ID and Username. So I need to add the 2 new columns to the existing Logging Table. I just added the 2 columns ‘Username’ and ‘SessionID’, but here is the full structure:
ALTER TABLE [dbo].[Log](
[LogID] [int] IDENTITY(1,1) NOT NULL,
[EventID] [int] NULL,
[Priority] [int] NOT NULL,
[Severity] [nvarchar](32) NOT NULL,
[Title] [nvarchar](256) NOT NULL,
[Timestamp] [datetime] NOT NULL,
[MachineName] [nvarchar](32) NOT NULL,
[AppDomainName] [nvarchar](512) NOT NULL,
[ProcessID] [nvarchar](256) NOT NULL,
[ProcessName] [nvarchar](512) NOT NULL,
[ThreadName] [nvarchar](512) NULL,
[Win32ThreadId] [nvarchar](128) NULL,
[Message] [nvarchar](1500) NULL,
[FormattedMessage] [ntext] NULL,
[Username] [varchar](200) NULL,
[SessionID] [varchar](50) NULL)
Split multi values
The extended properties are supplied by Enterprise Library within parameter @FormattedMessage as a string so I need to find a separator which would not appear in Session ID and Username. For this example I used an exclamation mark ! . So first I need to split the supplied @FormattedMessage into 2 values. Therefore I’ve implement the solution proposed at SqlServerCentral into the Logging Database on Azure SQL.
CREATE FUNCTION [dbo].[fnSplitString]
(
  @string NVARCHAR(MAX),
  @delimiter CHAR(1)
)
  RETURNS @output TABLE(rowID INT,splitdata NVARCHAR(MAX)
)
BEGIN
  DECLARE @start INT, @end INT, @count INT
  SELECT @start = 1, @end = CHARINDEX(@delimiter, @string) , @count = 1
  WHILE @start < LEN(@string) + 1
  BEGIN
    IF @end = 0
      SET @end = LEN(@string) + 1
    INSERT INTO @output (rowID,splitdata)
    VALUES(@count, SUBSTRING(@string, @start, @end - @start))
    SET @start = @end + 1
    SET @end = CHARINDEX(@delimiter, @string, @start)
    SET @count = @count + 1
  END
  RETURN
END
Update WriteLog Stored Procedure
To split the extended properties, existing stored procedure WriteLog needs to be updated. So here is the full procedure even though only the block at the beginning and of course the parameters in the INSERT-statement have been added.
ALTER PROCEDURE [dbo].[WriteLog]
(
  @EventID int,
  @Priority int,
  @Severity nvarchar(32),
  @Title nvarchar(256),
  @Timestamp datetime,
  @MachineName nvarchar(32),
  @AppDomainName nvarchar(512),
  @ProcessID nvarchar(256),
  @ProcessName nvarchar(512),
  @ThreadName nvarchar(512),
  @Win32ThreadId nvarchar(128),
  @Message nvarchar(1500),
  @FormattedMessage nvarchar(max),
  @LogId int OUTPUT
)
AS
BEGIN
  DECLARE @Username VARCHAR(200)
  DECLARE @SessionID VARCHAR(50)
  if @FormattedMessage is not null and len(@FormattedMessage) > 0
  BEGIN
    SELECT @Username = splitdata from [dbo].[fnSplitString] (@FormattedMessage, '!') Where rowID = 1
    SELECT @SessionID = splitdata from [dbo].[fnSplitString] (@FormattedMessage, '!') Where rowID = 2
  END
  ELSE
  BEGIN
    SET @Username = NULL
    SET @SessionID = NULL
  END
  INSERT INTO [Log] (EventID, Priority, Severity, Title, [Timestamp], MachineName, AppDomainName, ProcessID,
    ProcessName, ThreadName, Win32ThreadId, Message, FormattedMessage, Username, SessionID)
  VALUES (@EventID, @Priority, @Severity, @Title, @Timestamp, @MachineName, @AppDomainName, @ProcessID,
    @ProcessName, @ThreadName, @Win32ThreadId, @Message, @FormattedMessage, @Username, @SessionID)
  SET @LogID = @@IDENTITY
  RETURN @LogID
END
Update Text Formatter in web.config
Finally we need to update the text formatter in the web.config. In current example, the formatted message should only contain our extended properties. Of course you might add more data here, but take care to update the process in the stored procedure accordingly then.
<add template="{dictionary({value}!)}"
type="Microsoft.Practices.EnterpriseLibrary.Logging.Formatters.TextFormatter,
Microsoft.Practices.EnterpriseLibrary.Logging, Version=6.0.0.0,
Culture=neutral, PublicKeyToken=31bf3856ad364e35" name="Database Text Formatter" />
Hope this helps! Of course it would be possible to have it more dynamically so e.g. you only add new extended property and it’s added to a separated table etc. But I wanted to keep it simple to understand, maintain (e.g. disable process by just updating the stored procedure) and use (and also extend if you like).


