
Configure Azure and Google Firebase for push notifications in Xamarin Forms
One of the key features of modern smartphones (iPhone, Android, Windows Phone etc.) are push notifications. Unfortunately it’s not as easy as e.g. email. Therefore I’ve split my posting into 3 postings:
- Configure Azure and Google Firebase for push notifications in Xamarin Forms (the current posting)
- Setup server part for Xamarin Forms Push Notifications
- Setup Xamarin Forms Android App for Push Notifications
Technically you have a sender and a recipient, but it’s far more complicated than email.In fact, the way of the push notification will be like this:
client -> server -> azure -> Google Firebase (if it’s an android smartphone) -> Android Smartphone
Fortunately, there are already some very good docs available, so if you are completely new to push notifications make sure you have a look at these docs:
- Add push notifications to your Xamarin.Forms app
- How to: Add push notifications to a server project (in Work with the .NET backend server SDK for Azure Mobile Apps)
- Sending Push Notifications from Azure Mobile Apps
Make sure to have a look at these documents. Following these docs you are able to create a demo app with push notifications capabilities, even though some of the docs might be outdated because in How to use Server SDK (the second link) I get warning CS0618: “‘MobileAppOptionsExtensions.AddPushNotifications(MobileAppConfiguration)’ is obsolete: ‘Use App Service Push instead.’ “, and I switched over to the first link.
So in current post I just list all the steps to do when adding push notifications to a Xamarin Forms app. I leave out Windows Mobile as I’m currently developing for iOS and Android only, but it should be easy to add also Windows Mobile later on. To keep it short and structured, in current post I just summarize the things to do in the cloud, means Azure and Google Firebase.
Set up Google Firebase
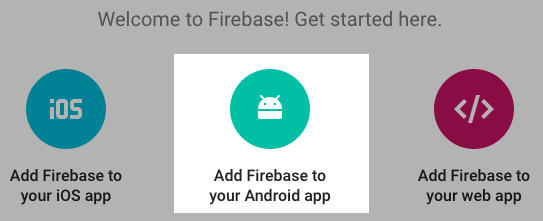
Googles Firebase Cloud Messaging (FCM) has replaced Google Cloud Messaging (GCM) and is the current solution to send push notifications to Android Smartphones. Even though FCM could also send push notifications to iPhones, we only use Firebase for Android Smartphones. So go to FCM Console and click “Add Project”. Now enter a project name, select your country and confirm. Your project is now created. Select “Add Firebase to your Android app”
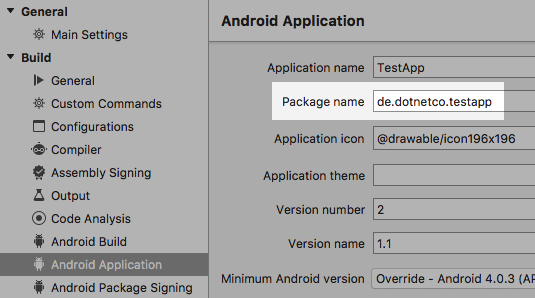
First you need to enter the Android package name. Therefore, in your Xamarin Forms App, open the options of your Android project and have a look at Build -> Android Application. Copy the package name into the Firebase input field.
Additionally you could enter a nickname for your app and a debug signing certificate. Both is not necessary, but a nickname might be handy. The debug signing certificate could be set up somewhen later, it’s not necessary for push notifications so we could ignore it here. Click “Register App” to continue.
On next page you could download your google-services.json. This is not necessary for Xamarin Forms so we could skip this step. Also the gradle instructions could be ignored so with a click on “Finish” we are done with Firebase setup. Later on we need to come back to copy the key for azure, but therefore we have to set up Azure first.
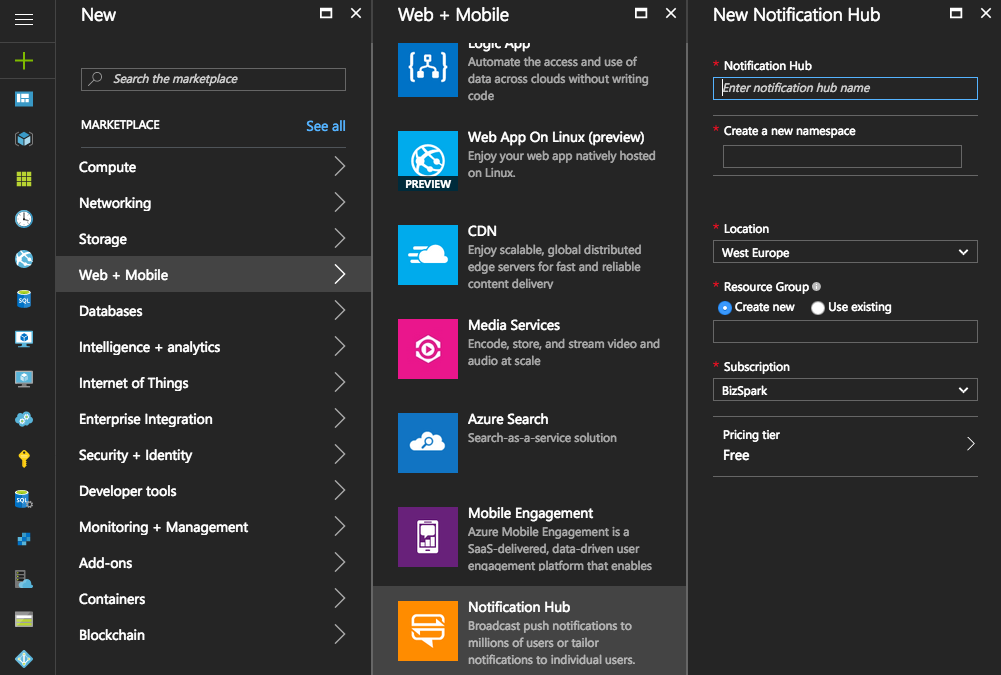
Set up Azure Notification Hub
Now we set up Microsoft Azure Notification Hub. So from Azure Portal, click + to add a new resource and type ‘Notification Hub’ or select Web+Mobile -> Notification Hub. Enter some data about your new notification hub here.
Click on “Create” and wait for it. It might take 1 or 2 minutes to complete.
Configure Notification Hub
Once the notification hub is created, select it e.g from “All Resources”. Within “Manage”, select “Notification Services”. You’ll find a list with all available notification services like Apple Push Notification Service (APNS). Don’t worry that Googles Notification Service is still listed as “Google Cloud Messaging (GCM)”, it’s nevertheless working find with the new Firebase Cloud Messaging (FCM). So click on “Google (GCM)”.
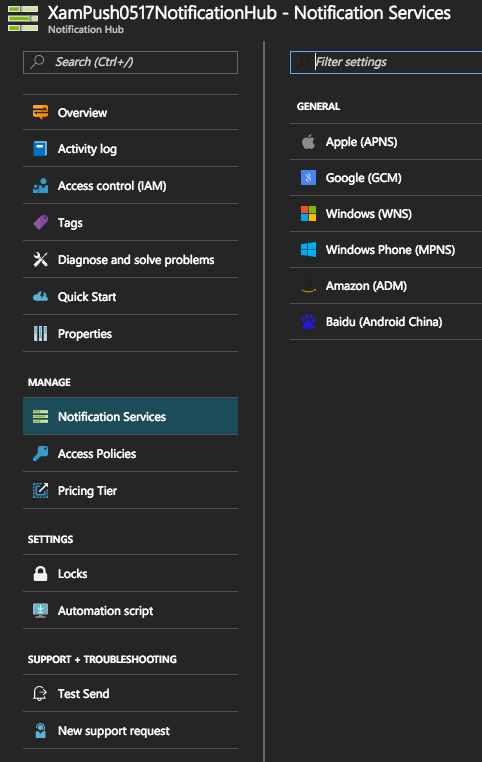
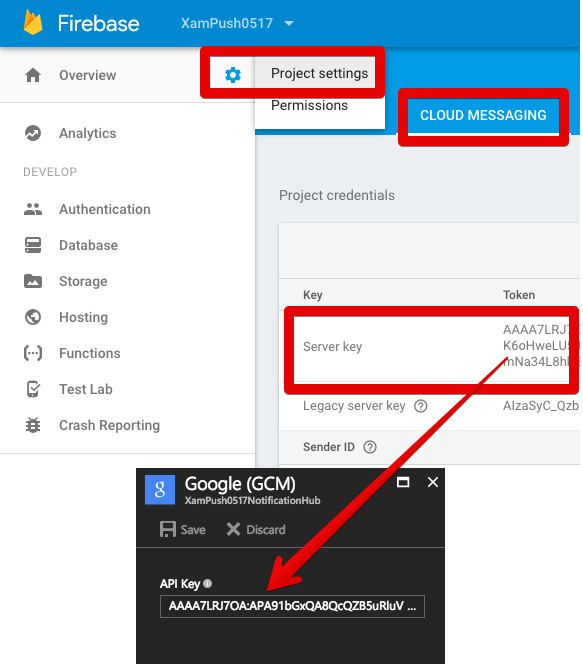
There is only one input field now: API Key. To find the API key, go back to Firebase. Click on the settings cog and select “Project settings”. On the new window, open the “Cloud Messaging” tab. There you will find a server key, a legacy server key and a sender id. Copy the whole server key which spans 3 lines. Take care: Sometimes the website does not show the full key! So it’s important to make sure the whole key is shown (no points … at the end), therefore it’s advised to use the “Copy to Clipboard” icon which will appear as soon as you move the mouse into the server key field. Once copied into clipboard, paste it into the “API Key” input field on Azure. Click “Save” to store the API Key in Azure.

So that’s it for the cloud configuration so far. We have now configured Googles Firebase Cloud Messaging (FCM) and Microsoft Azures Notification Hub to use FCM for sending push notifications to Android Smartphones.
Next posting will show how to set up the server application for push notifications and how to update your existing Xamarin Forms application.

